image sensor sizes chart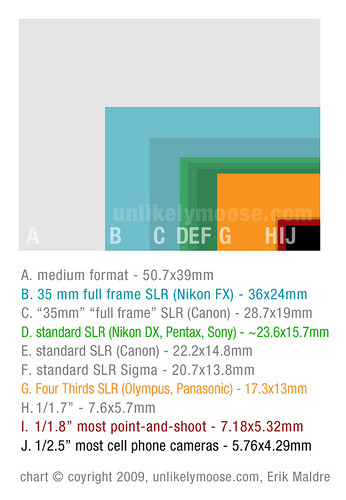
Image by unlikelymoose
Here's a chart comparing the different image sensors for digital cameras. This chart is downloadable at 300 dpi. The text in this chart is 7 point. The other chart is in 10 point.
Some observations from my blog:
www.unlikelymoose.com/blog/comments/1319_0_1_0_C/
Quality of digital photographs are determined by four major factors:
1. image sensor size and quality
2. lens optics
3. megapixels
4. processing core
These are placed in order of importance. Yea, image sensors and lens optics are that important.
I have never seen a good illustration comparing the basic image sensors so I put one together. There's also a 300 dpi illustration on my flickr page.
Some observations:
I was shocked to see how much smaller Canon's "full frame" (C) is than Nikon's full frame (B). Hooray for Nikon. Canon's "full frame" can be considered to be simply a half way point between Nikon's standard SLR sensor (D) and Nikon's full frame sensor (B).
And of course the medium format sensor just destroys all the other sensors out there. Got about 20 grand? That's what it'll cost to buy a medium format digital camera (as of this posting).
Four Thirds SLR is an intriguing option. It's not too much smaller than the standard SLR sensors. The advantage of the Four Thirds system is that it allows for much, much smaller SLR bodies. (There's no bulky mirror system necessary. Technically when there's no mirror system, it's call Four Thirds Micro, but it uses the exact same sensor as the cameras with mirrors.)
1/1.8" (I) is what most consumer cameras have. Notice how much smaller it is compared to the SLR sensors. That's why you get superior image quality from an SLR image sensor.
image sensor sizes chart (larger text)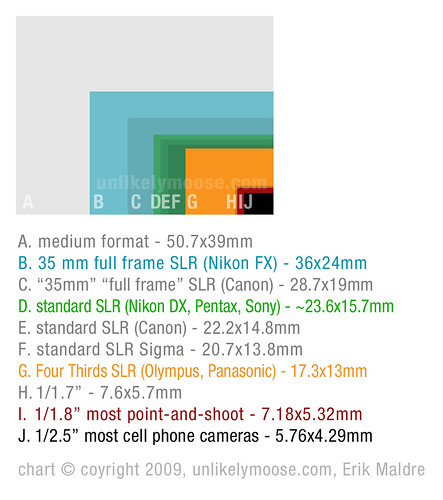
Image by unlikelymoose
Here's a chart comparing the different image sensors for digital cameras. This chart is downloadable at 300 dpi. The text in this chart is 10 point. The other chart is in 7 point.
Some observations from my blog:
www.unlikelymoose.com/blog/comments/1319_0_1_0_C/
Quality of digital photographs are determined by four major factors:
1. image sensor size and quality
2. lens optics
3. megapixels
4. processing core
These are placed in order of importance. Yea, image sensors and lens optics are that important.
I have never seen a good illustration comparing the basic image sensors so I put one together. There's also a 300 dpi illustration on my flickr page.
Some observations:
I was shocked to see how much smaller Canon's "full frame" (C) is than Nikon's full frame (B). Hooray for Nikon. Canon's "full frame" can be considered to be simply a half way point between Nikon's standard SLR sensor (D) and Nikon's full frame sensor (B).
And of course the medium format sensor just destroys all the other sensors out there. Got about 20 grand? That's what it'll cost to buy a medium format digital camera (as of this posting).
Four Thirds SLR is an intriguing option. It's not too much smaller than the standard SLR sensors. The advantage of the Four Thirds system is that it allows for much, much smaller SLR bodies. (There's no bulky mirror system necessary.)
1/1.8" (I) is what most consumer cameras have. Notice how much smaller it is compared to the SLR sensors. That's why you get superior image quality from an SLR image sensor.
framed lotus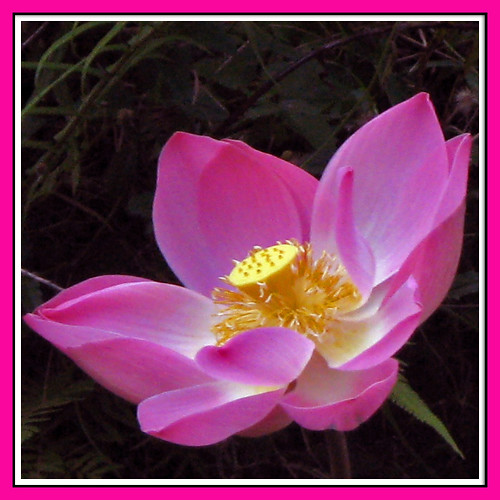
Image by whitecat sg
Tried out the adding of a frame in Photoshop.
1: choose a photo to frame - duplicate the layer (call layer "photo").
2: select background layer
3: go to Image - Canvas Size
4: tick box "Relative", change to pixels, and add the width for your frame, e.g. 50 pixels (note: 50 means each side will get 25 pixels width of frame).
5: choose Canvas extension color - this is the color that will come on the outside of your frame (in my case bright pink)
6: select all on background layer - and then create a new layer with this selection - call it "inside frame"
7: go to Select - Modify - Contract and choose e.g. 15 pixels (this will make your selection 15 pixels smaller on each side.
8: choose Edit - Fill and select the fill color for the middle part of the frame, in my case black.
9: go to Select - Modify - Contract and choose e.g. 3 pixels
10: Edit - Fill and select the innermost frame color, in my case white.
11: Unselect selection. Make sure your photo layer is on top of the inner frame layer.
12: optional: you can double click on the "inner frame" layer and select a blending effect like drop shadow or inner shadow (in my case chose inner shadow)
Ready!
If you want to make a standard frame for a set of photos, then record your actions and batch apply the effect to your set of photos (e.g. if you want to add a frame with the name of your holiday destination and the year for instance you could do this).
6x9 frame mask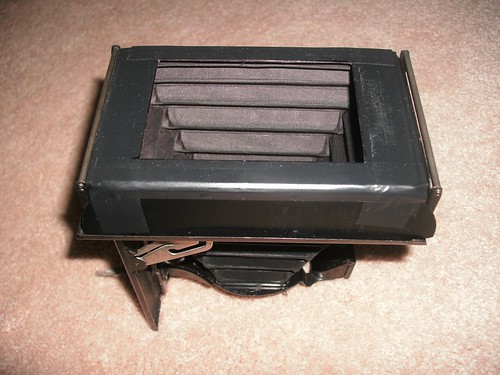
Image by atomicules
Another bit of Christmas card. I went for a 6x9 frame (56mm x 84mm) because it was the biggest standard 120 format frame size I could fit in.
The consensus seems to be to make up a panoramic frame size and take advantage of the length of the 116 frame, but for starters I don't process myself so I wanted to keep it as standard as possible. And secondly it meant I could re-position the red window and use the standard frame numbering on the backing paper of 120 films. Lastly, 8 shots per roll is a bit better than 4 or so.
I covered the cardboard in black tape and used a black marker pen on the inside edges (since it was white cardboard). More black tape to hold it onto the camera. This is a completely reversable alteration and means I could always change to a different frame size (panoramic) in the future.
HDV still frame—unretouched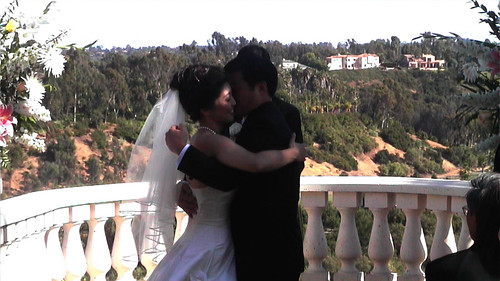
Image by tychay
This is a still frame from a high definition videocamera that Caitlin is using for their wedding highlights montage. You can appreciate the lovely 16:9 framing of the HD standard instantly which is wide enough to frame the shot with my father in the lower right and the flowers in the upper right without turning the couple into a tiny set of blurry dots. If you view the full size you can see that, while HDV is superior to regular DV, the JY-HD10U has a lot of color noise in the shadow. She is doing a photo-to-movie effect on this so I retouched it which you can read about here.
( JVC JY-HD10U ) 720p HDV stillframe
Photoshop (resize)
No comments:
Post a Comment